Steve
Society Members
vintageradio.co.nz
Posts: 727
|
Post by Steve on Aug 17, 2018 18:54:50 GMT 12
This is the last full restoration I did, back around Christmas time (yes it IS time I did another!). It came about because we'd just moved into our new place and this set was sitting on the floor right in my way... so as soon as the bench came in I put it up there so I wouldn't trip over it... and since I kind of liked the look of it... well, one thing led to another...  The cabinet wasn't too bad - and the chassis looked ok at first glance...  but on closer inspection it turns out that it had spent quite a few years doubling as a urinal for rodents...  It seemed like the only reasonable thing to do was fix that up a little... and so instead of a quick recap things got a little out of hand... |
|
Steve
Society Members
vintageradio.co.nz
Posts: 727
|
Post by Steve on Aug 17, 2018 18:59:52 GMT 12
The chassis had been worked on quite a bit in the past by the looks of things - but all coils, transformers and even the candohm resistor were fine.   Since I was going to have to tackle rust that had literally eaten away metal in places I figured the best thing was to just remove a few things to make room...  But that just made me realise there was more room needed... |
|
Steve
Society Members
vintageradio.co.nz
Posts: 727
|
Post by Steve on Aug 17, 2018 19:06:16 GMT 12
So after removing a couple more bits I was left with this  Wire brushing wasn't really doing too much  So it got a long bath in rust converter, more wire brushing, a good clean, 2 coats of high-build primer, a light sand and then some 'Export Quality' copper spray paint from Super Cheap Auto (called "New Copper") which is a very good match for the original copper colour used on Rolls chassis'. Its still quite pitted looking but the only real fix for that was either bog which would eventually flake back out or making the chassis anew... and I wasn't quite ready to go that far.  |
|
Steve
Society Members
vintageradio.co.nz
Posts: 727
|
Post by Steve on Aug 17, 2018 19:06:44 GMT 12
 Coil cans - a bit scruffy  Thats better... but now the wiring looks a mess  Much better... |
|
Steve
Society Members
vintageradio.co.nz
Posts: 727
|
Post by Steve on Aug 17, 2018 21:10:22 GMT 12
 Starting to reassemble  ensuring good earths for the valve shields  and back together |
|
Steve
Society Members
vintageradio.co.nz
Posts: 727
|
Post by Steve on Aug 17, 2018 21:21:09 GMT 12
There is no way I'd put a set back together after a full strip-down and have it work again... so I've learned to take a lot of photos, a lot of notes and to draw in sections of the schematic as components and wires get re-fitted... this is part of the documentation I have on the wall behind the bench...  And this about 1 or 6 pages of hand-drawn notes on how wires are not only connected but routed as well. If I'm stripping and reassembling in the same day I can generally put things back ok - but that never happens... the electrical side of this restoration happened over around 6 weeks... there was no way I was going to get it right without meticulous notes. 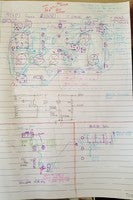 And for the record, there were a couple of points where the schematic did not tie up with the set - one obviously either a mistake or a deliberate omission - the HT supply to the output valve (2A5), and the power supply second filter cap runs to the chassis not the field coil as shown.  |
|
Steve
Society Members
vintageradio.co.nz
Posts: 727
|
Post by Steve on Aug 17, 2018 21:30:40 GMT 12
A serviceman previous had replaced the electros and pulled the old ones... fortunately I have a stash of old ones I keep for just this reason... I found two that were the right era, and right size.  I did consider restuffing the cans, but decided on tagstrip instead, using the original stud as a solder point to mount it on. After a liberal clean and polish it was ready to fit.  And here it is, with the wiring starting to take shape. I did not want to use blue for everything - but it all appears to have been blue in the first place, so I was just following what Radio Ltd had done back in 1937 (apart from the small bits of heatshrink which I do for two reasons - one is to stop the wire fraying and the other is just because I like how it looks... so based on that alone I could have used different colour wiring but I felt like I needed to try and use the colours as they were originally... so here it is... blue blue and more blue.  |
|
Steve
Society Members
vintageradio.co.nz
Posts: 727
|
Post by Steve on Aug 17, 2018 21:36:22 GMT 12
|
|
Steve
Society Members
vintageradio.co.nz
Posts: 727
|
Post by Steve on Aug 17, 2018 21:40:45 GMT 12
 From this... ...to this  |
|
Steve
Society Members
vintageradio.co.nz
Posts: 727
|
Post by Steve on Aug 17, 2018 21:42:16 GMT 12
 And from this... ...to this  |
|
Steve
Society Members
vintageradio.co.nz
Posts: 727
|
Post by Steve on Aug 17, 2018 21:46:21 GMT 12
|
|
Steve
Society Members
vintageradio.co.nz
Posts: 727
|
Post by Steve on Aug 17, 2018 21:49:51 GMT 12
One last job before it all goes back together for good...  The dial has a stunning almost fluorescent glow to it.  Thats it - all done. Overkill? You bet. But it should be good for a few years to come yet. Cheers Steve |
|
|
|
Post by paraglide on Aug 21, 2018 5:29:53 GMT 12
Great report and well done
|
|
|
|
Post by DHockey on Aug 21, 2018 8:58:59 GMT 12
Great work Steve! This is the sort of thing I hope we see more of on the forum in future. Thanks for taking the time to post it.
Daniel
|
|
Steve
Society Members
vintageradio.co.nz
Posts: 727
|
Post by Steve on Aug 21, 2018 9:42:28 GMT 12
I love restoring sets, but at the rate I get them done I'll only maybe get one post a year in here... Which means I'll need to live to around 250 to get through my collection :-)
Cheers
Steve
|
|


